| 5. The XHTML toolbar | ||
|---|---|---|
 |  | |
| 5. The XHTML toolbar | ||
|---|---|---|
| | | |
The XHTML tool bar starts with a number of “text style” toggles. These toggles emulate the behavior of the Bold, Italic, Underline, etc, toggles found in the tool bars of almost all word-processors. More information about text style toggles in About “text style” toggles in XMLmind XML Editor - Online Help.
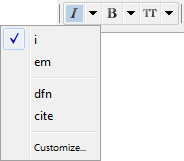
In the above screenshot, the caret is inside an i element and the user clicked the arrow button next to a “italic text style” toggle.

“Toggle” element i. Next to this toggle is found an arrow button displaying a menu containing additional checkboxes for the following elements: em, dfn, cite.

“Toggle” element b. Next to this toggle is found an arrow button displaying a menu containing additional checkboxes for the following elements: strong, abbr.

“Toggle” element tt. Next to this toggle is found an arrow button displaying a menu containing additional checkboxes for the following elements: code, var, kdb, samp.

Displays a menu letting the user change the character case of selected text. If a single node is selected, this converts the character case of all the text contained in this node. If there is no selection of any kind, this converts the character case from caret position to end of word, then it moves the caret to the next word.
All characters are converted to lowercase characters. Keyboard shortcut: Esc+l.
All characters are converted to uppercase characters. Keyboard shortcut: Esc+u.
First character of a word is converted to an uppercase character. The other characters are converted to lowercase characters.Keyboard shortcut: Esc+c.

Convert implicit or explicit selection to plain text.

Converts the selection, if any, to a link; simply inserts an empty link at caret position otherwise. A link is an a element having an href attribute.

This button displays a menu having 2 entries: and .
The menu entry displays a dialog box letting the user search and select anchors (that is, any element having an ID) and links.
| Button "" (respectively "") copies selected ID (respectively selected link target) to the clipboard. |
| Button copies selected anchor or link element to the clipboard just like → in XMLmind XML Editor - Online Help. |
| Button "" copies selected anchor element as a reference to the clipboard just like → → in XMLmind XML Editor - Online Help. |

Convert a paragraph to a list item and a list item to a paragraph, the new element having a lesser nesting level than the original one. This button automatically splits lists when needed to.
This is the inverse command of "". More Information below.

Convert a paragraph to a list item and a list item to a paragraph, the new element having a greater nesting level than the original one. This button automatically creates lists or merges adjacent lists when needed to.
Note that the two above buttons strictly alternate between paragraphs and list items. This means that you'll often have to click a button twice in a row. For example, in order to create a nested list, first click anywhere inside a list item and then click "" twice. First click converts the list item to a plain paragraph contained in the preceding list item. Second click converts this paragraph to the first item of a new nested list.
For the two above buttons to function, any of the following conditions should be met:
A sequence of list items must be explicitly selected.
A list must be explicitly selected. This is equivalent to selecting all its items.
A sequence of blocks starting with a paragraph must be explicitly selected.
A paragraph must be implicitly selected. In order to implicitly select a paragraph, suffice to click anywhere inside it. However if this paragraph is the first child of a list item, then it's the list item which is implicitly selected.
A list item to be implicitly selected. In order to implicitly select a list item, suffice to click anywhere inside it.
![[Tip]](images/tip.svg) | |
When a paragraph is to be converted to a new list using this "" button, there is a quick and simple way to specify the kind of list to be created:
These “prefixes” are used to create respectively: , , , , , , , as if the "" button below was automatically used. |

Displays a popup menu allowing to change the type of the current list.
The list must be explicitly or implicitly selected. In order to implicitly select a list, suffice to click anywhere inside it.

Displays a menu allowing to select a type of list (ul, ol, dl). The chosen list is added after node selection or after caret at a location where it is valid to do so.

Add a p element after node selection or after caret at a location where it is valid to do so.

Add a li element or a dt/dd pair after current list item. For this command to work, suffice to click anywhere inside an ul, ol or dl element.

Add an pre element after node selection or after caret at a location where it is valid to do so.
Menu entry "" normalizes whitespace in implicitly or explicitly selected pre element. Normalizing whitespace means: expanding tab characters to a number of space characters and removing the space characters which are common to the beginning of all text lines (that is, removing the superfluous “indentation” in the pre element, if any).

Displays a menu letting the user:
insert an img element at caret position;
OR add a div element containing an img or a figure element containing an img (XHTML 5 only) after node selection or after caret at a location where it is valid to do so;
OR add a div element containing an img and a map after node selection or after caret at a location where it is valid to do so.
After using this "" menu item, right-click anywhere inside the newly inserted map element and select "" from the contextual popup menu to display an image map editor. This image map editor allows to add “hot areas” to your image. More information in Section 17, “The "Edit Image Map" dialog box” in XMLmind XML Editor - Online Help.

(XHTML 5 only.) Displays a menu letting the user add various kinds of MathML equations after node selection or after caret at a location where it is valid to do so.

(XHTML 5 only.) This toolbar button is present only when an XHTML 5 document is opened. Displays a menu letting the user insert a media element at caret position.
XHTML 5 audio element allowing to add audio to your document. More information in Section 16, “The media player dialog box” in XMLmind XML Editor - Online Help.
XHTML 5 video element allowing to add video to your document. More information in Section 16, “The media player dialog box” in XMLmind XML Editor - Online Help.
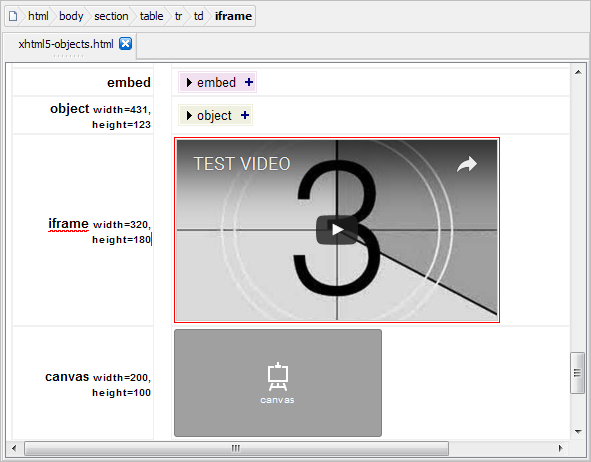
An iframe element showing a sample YouTube™ video. More information in Section 5.2, “The iframe editor dialog box”.

Displays a menu which allows to add an h1, h2, h3, etc, element after node selection or after caret at a location where it is valid to do so.

(XHTML 5 only.) Displays a menu which allows to add a section, aside, article, header or footer element after node selection or after caret at a location where it is valid to do so.

Displays a menu which allows to add several styles of tables after node selection or after caret at a location where it is valid to do so.


The following table editing commands fully support HTML tables. Most table editing commands can be repeated by using → (Ctrl+A).
| Button | Menu item | Description | |||
|---|---|---|---|---|---|
For a command in this menu to work, click anywhere inside a cell (or explicitly select a cell or an element having a cell ancestor). |  | Insert a column before column containing specified cell. | |||
 | Insert a column after column containing specified cell. | ||||
 | Cut to the clipboard the column containing specified cell. | ||||
 | Copy to the clipboard the column containing specified cell. | ||||
 | Paste copied or cut column before column containing specified cell. | ||||
 | Paste copied or cut column after column containing specified cell. | ||||
 | Delete the column containing specified cell. | ||||
 | Sort all the rows of the table according to the string values of the cells of the “selected column”. (The “selected column” is the column containing specified cell.) A dialog box is displayed allowing to specify the following sort options:
Note that:
| ||||
For a command in this menu to work, click anywhere inside a cell (or explicitly select a cell or an element having a cell ancestor) or explicitly select a row. |  | Insert a row before row containing specified cell.
| |||
 | Insert a row before row containing specified cell. | ||||
| | Cut to the clipboard the row containing specified cell. | ||||
| | Copy to the clipboard the row containing specified cell. | ||||
| | Paste copied or cut row before row containing specified cell. | ||||
| | Paste copied or cut row after row containing specified cell. | ||||
 | Delete the row containing specified cell. | ||||
For a command in this menu to work, click anywhere inside a cell (or explicitly select a cell or an element having a cell ancestor). |  | Increment the number of columns spanned by specified cell. | |||
 | Decrement the number of columns spanned by specified cell. | ||||
 | Increment the number of rows spanned by specified cell. | ||||
 | Decrement the number of rows spanned by specified cell. | ||||
 (XHTML 1.0 and 1.1 configurations) (XHTML 1.0 and 1.1 configurations) | Displays a dialog box allowing to give a background color to specified cell. | ||||
| (XHTML 5 configuration) | Displays a dialog box allowing to format specified cell. This dialog box makes it easy and safe setting the |
By default, an iframe element is rendered by embedding a Web browser in the styled view.
![[Note]](images/note.svg) | |
This feature, which is based on JavaFX®, will not work if the Java™ runtime used to run XXE is older than version 1.8.0_40. Moreover, this feature may be explicitly disabled by unchecking → , General|Feature, "In the styled view, render audio and video elements by embedding a media player" in XMLmind XML Editor - Online Help. |
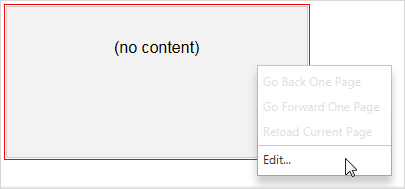
A newly embedded Web browser is not configured yet (e.g. does not point to any HTML content) and just looks like an empty gray rectangle.
In order to configure a media player, you may either:
double-click inside it;
OR right-click in it and select the menu item;
OR drag and drop an HTML file onto it.
The three above actions all display the iframe editor dialog box.
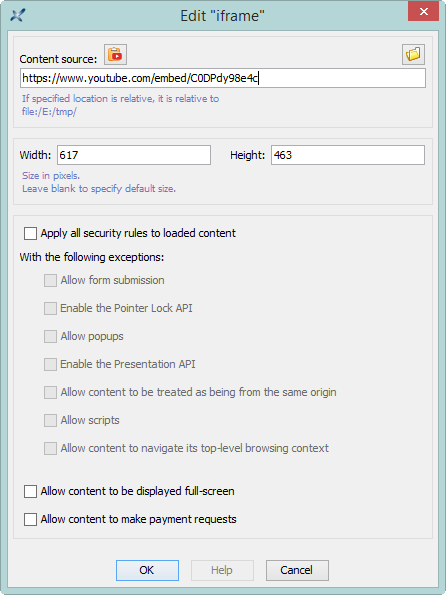
An iframe element is configured as follows:
Specify the location of the HTML page to be displayed by the embedded Web browser. This location may be an absolute or relative URL. A relative URL is relative to the URL of the document being edited.
This field corresponds to the src attribute of the iframe element.
Optionally, give a width and/or a height to the iframe. These dimensions are specified in pixels. The default size is 300x200. When a single dimension is specified, the other dimension is automatically computed using a 2:1 width/height ratio.
These fields corresponds to the width and height attributes of the iframe element.
Optionally, specify security options for the HTML content of the iframe element by checking one or more security option checkboxes.
Note that settings such security options have no effect on the Web browser embedded in the styled view of XXE. These checkboxes correspond to values of the sandbox attribute of the iframe element. For example, checking "Apply all security rules" alone adds attribute sandbox="" to the iframe element. Other example, checking "Apply all security rules" then "Allow popups" and "Allow scripts" adds attribute sandbox="allow-popups allow-scripts" to the iframe element.
| | | |
| 4. The menu |  | 6. Other custom bindings |