| 13.2. Reference | ||
|---|---|---|
 | 13. The "Customize Document Conversion Stylesheets" dialog box |  |
| 13.2. Reference | ||
|---|---|---|
| | 13. The "Customize Document Conversion Stylesheets" dialog box | |
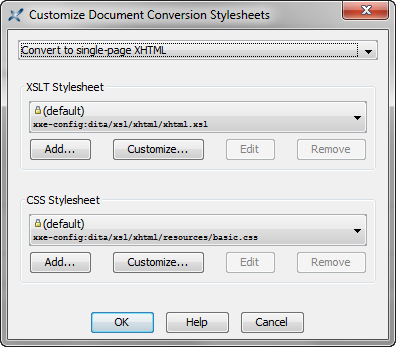
"XSLT stylesheet" frame:
This combobox allows to select:
the default stock XSLT stylesheet,
an alternate stock XSLT stylesheet (if any),
a custom XSLT stylesheet added using the button,
a custom XSLT stylesheet created using the button.
Add an existing custom XSLT stylesheet. This button displays a dialog box allowing to specify the filename of a custom XSLT stylesheet and also to give it a short title (a title is required).
Create a custom XSLT stylesheet based on the currently selected stock XSLT stylesheet.
It's not possible to create a customization of a custom XSLT stylesheet.
A custom XSLT stylesheet created this way merely imports the stock XSLT stylesheet. Example:
<xsl:stylesheet xmlns:xsl="http://www.w3.org/1999/XSL/Transform"
                version="1.0">
  <xsl:import href="docbook-config:xsl/fo/docbook.xsl"/>
  <!-- REDEFINE PARAMETERS AND ATTRIBUTE-SETS HERE -->
</xsl:stylesheet>
After such custom XSLT stylesheet has been created, the user is expected to click to populate it with parameters and attribute-sets.
If the custom XSLT stylesheet has been created using the button, this button starts the "XMLmind XSL Customizer" application in order to edit it. Otherwise, this button starts a helper application allowing to edit XSLT files.
It's not possible to edit a stock XSLT stylesheet.
![[Tip]](images/tip.svg) | |
Clicking while keep the Shift key pressed allows to start a helper application rather than the "XMLmind XSL Customizer" application. |
Remove the currently selected custom XSLT stylesheet from the combobox. Of course, clicking does not delete the XSLT file.
It's not possible to remove a stock XSLT stylesheet.
"CSS stylesheet" frame (this frame is absent when the output format is based on XSL-FO):
This combobox allows to select:
the default stock CSS stylesheet,
an alternate stock CSS stylesheet (if any),
a custom CSS stylesheet added using the button,
a custom CSS stylesheet created using the button.
Add an existing custom CSS stylesheet. This button displays a dialog box allowing to specify the filename of a custom CSS stylesheet and also to give it a short title (a title is required).
Create a custom CSS stylesheet based on the currently selected stock CSS stylesheet.
It's not possible to create a customization of a custom CSS stylesheet.
A custom CSS stylesheet created this way merely imports the stock CSS stylesheet. Example:
@charset "UTF-8";
@import url(base.css);
/* ADD YOUR STYLES HERE */
After such custom CSS stylesheet has been created, the user is expected to click to populate it with styles.
Starts a helper application allowing to edit CSS files.
It's not possible to edit a stock CSS stylesheet.
Remove the currently selected custom CSS stylesheet from the combobox. Of course, clicking does not delete the CSS file.
It's not possible to remove a stock CSS stylesheet.
Open a DITA map in XMLmind XML Editor.
Select menu item → → . This displays the "Customize Document Conversion Stylesheets" dialog box.
Select "Convert to PDF, PostScript" in the top combobox.
In the "XSLT stylesheet" frame, click . This displays the following dialog box:
Specify the filename of the XSLT stylesheet which is to contain your customization of the stock dita-config:xsl/fo/fo.xsl XSLT stylesheet.
Also required: give a short title to your customization in the Description field.
In the "XSLT stylesheet" frame, click . This displays the main window of the "XMLmind XSL Customizer" application.
Select the Attribute Sets tab and click to add attribute background-color=#CCCCCC to the attribute-set called topic-title. How to do this is detailed in the example below.
Select the Parameters tab and click to specify the following parameter: base-font-size=12pt. How to do this is detailed in the example below.
Click toolbar button to save your changes.
Click toolbar button to close "XMLmind XSL Customizer" window.
Click to close the the "Customize Document Conversion Stylesheets" dialog box.
Open a DITA map in XMLmind XML Editor.
Select menu item → → . This displays the "Customize Document Conversion Stylesheets" dialog box.
Select "Convert to single-page XHTML" in the top combobox.
In the "CSS stylesheet" frame, click . This displays the following dialog box:
Specify the filename of the CSS stylesheet which is to contain your customization of the stock dita-config:xsl/xhtml/resources/base.css XSLT stylesheet.
Also required: give a short title to your customization in the Description field.
In the "CSS stylesheet" frame, click . This displays the "Helper Application Not Found" dialog box[31]. This dialog box allows to specify which editor is to be used to edit a CSS file. By default, the "Helper Application Not Found" dialog box suggests to use a text editor.
Replace the line:
/* ADD YOUR STYLES HERE */
by:
body {
    font-size: 12pt;
}

.part-title,
.chapter-title,
.appendices-title,
.appendix-title,
.section1-title,
.section2-title,
.section3-title,
.section4-title,
.section5-title,
.section6-title,
.section7-title,
.section8-title,
.section9-title,
.topic-title {
    background-color: #CCCCCC;
}
Make sure not to modify the @import line.
Save your changes.
Make sure to use an UTF-8 encoding for the save file.
Quit the text editor.
Click to close the the "Customize Document Conversion Stylesheets" dialog box.
The "Customize Document Conversion Stylesheets" dialog box lets a user create and select custom XSLT or CSS stylesheets which are used when converting XML documents to formats such PDF, RTF, EPUB, etc.
The custom XSLT or CSS stylesheets selected using the "Customize Document Conversion Stylesheets" dialog box are used for all the documents having the same document type (e.g. all DocBook documents or all XHTML 5 documents). Moreover, a custom stylesheet selection made this way is persistent across editing sessions.
Now let's suppose you want to use a custom XSLT stylesheet and a custom CSS stylesheet when converting DITA maps to Web Help and you want to use a custom XSLT stylesheet when converting DITA maps to PDF. However, you want to use these custom stylesheets only when converting DITA maps containing tutorials. You consider that the stock XSLT and CSS stylesheets are just fine for the other kinds of DITA documents, for example, for reference manuals.
Here's how to do this:
Use the "Customize Document Conversion Stylesheets" dialog box, select "Convert To Web Help" and declare your custom XSLT stylesheet webhelp_tutorials.xsl.
Specify "Tutorial Styles" in the Description field of the custom XSLT stylesheet chooser dialog box.
Do not select webhelp_tutorials.xsl, as this would instruct XXE to use this custom XSLT stylesheet for all DITA map documents.
Use the "Customize Document Conversion Stylesheets" dialog box, select "Convert To Web Help" and declare your custom CSS stylesheet webhelp_tutorials.css.
Specify "Tutorial Styles" in the Description field of the custom CSS stylesheet chooser dialog box.
Do not select webhelp_tutorials.css.
Use the "Customize Document Conversion Stylesheets" dialog box, select "Convert To PDF, PostScript" and declare your custom XSLT stylesheet fo_tutorials.xsl.
Specify "Tutorial Styles" in the Description field of the custom XSLT stylesheet chooser dialog box.
Do not select fo_tutorials.xsl.
![[Important]](images/important.svg) | |
Make sure to specify exactly the same description for all the custom XSLT or CSS stylesheets belonging to the same stylesheet set. |
In all the DITA maps containing tutorials you'll author, insert the following processing-instruction:
<?xxe-stylesheet-set Tutorial Styles?>
as a direct child of the root element (e.g. the DITA map or bookmap).
The position as a child of the root element does not matter. For example, you may insert this processing-instruction at the beginning or at the end of the map root element.
<map xml:lang="en-US">
  <?xxe-stylesheet-set Tutorial Styles?>
  <title>Tutorial: how to fix gizmos</title>
  ...
</map>
From now, when converting a DITA map containing <?xxe-stylesheet-set Tutorial Styles?> to WebHelp or PDF, XXE will automatically use webhelp_tutorials.xsl, webhelp_tutorials.css, fo_tutorials.xsl.
What if you a DITA map containing <?xxe-stylesheet-set Tutorial Styles?> to EPUB or DOCX? Remember that you did not use "Customize Document Conversion Stylesheets" to declare custom XSLT or CSS stylesheets called "Tutorial Styles" for these output formats. Well, it will work just fine. When converting your tutorial to EPUB or DOCX, processing-instruction <?xxe-stylesheet-set Tutorial Styles?> will be silently ignored.
[31] Unless the user has already specified which is the helper application she/he prefers to edit a CSS stylesheet. This kind of preference is specified by using → , Tools|Helper Applications section. More information in Section 6.8.5, “Helper applications options”.
| |  | |
| 13.1. Introduction |  | 13.3. The "XMLmind XSL Customizer" application |

