4. About ".profiles" files | ||
|---|---|---|
 |  | |
4. About ".profiles" files | ||
|---|---|---|
| | | |
A ".profiles" file contain a specification of one or more conditional processing profiles in a proprietary format.
However it's important to always use XMLmind XML Editor to create and modify such files.
It's equally important to always use the right document template. For example, you cannot associate a ".profiles" file created using the "DocBook v5+|Conditional Processing Profiles" document template to a DITA map or topic. Only a ".profiles" file created using the "DITA|Conditional Processing Profiles" document template can be associated to a DITA map or topic.
The reason for these restrictions is that, each time you save a ".profiles" file to disk, XMLmind XML Editor automatically creates a profile_set_name_files/
One native implementation per profile contained in the profile set. For example, when you save editions.profiles to disk, XMLmind XML Editor automatically creates editions_files/lite.ditaval, editions_files/pro.ditaval and editions_files/ultimate.ditaval.
DITA implementation only: as of version 9, XMLmind XML Editor also automatically creates a simple subject scheme map file for use by → . For example, when you save editions.profiles to disk, XMLmind XML Editor also automatically creates editions_files/attributeValues.ditamap.
![[Note]](images/note.svg) | |
If you last saved your " |
The example above shows how to mark contents displayed on screen by XMLmind XML Editor and how to exclude marked contents from the deliverables. However in some cases, you just want to flag (i.e. highlight) some contents in the deliverables, not exclude it.
This is possible too using a ".profiles" file, but only when this file has been created for/is associated to a DITA document.
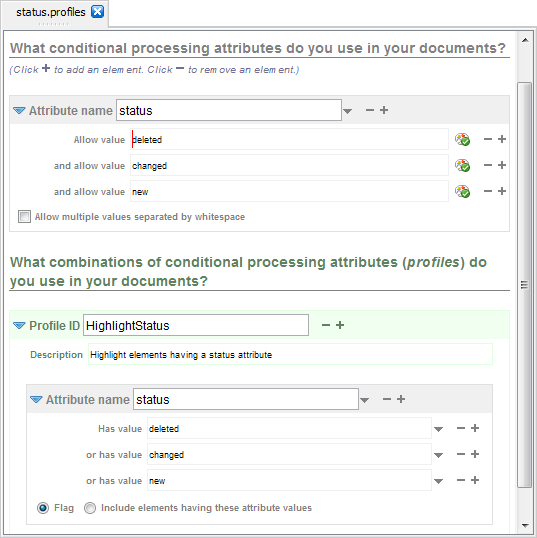
Let's suppose you want to respectively strike out, give a green color and underline, elements having a status attribute respectively equals to deleted, changed and new.
Create a ".profiles" file using → , "DITA|Conditional Processing Profiles". Let's call this file status.profiles.
Declare status as being a profiling attribute and allow values deleted, changed and new.
Click the  button which is next to each "Allow value" field. This button displays the "Set Style" dialog box. Use this dialog box to give distinctive styles to
 deleted, changed and new; for example, strike out, green color and underline.
Define a profile making use of attribute status and all its values. For example, let's call this profile HighlightStatus.
Check , the checkbox found below the list of "Has value" items. (Note that by default, it is and not which is checked.)
Associate status.profiles and its profile HighlightStatus to your DITA map.
Doing this will not only mark elements having a status attribute in the styled views of the DITA map and all the referenced topics, but also flag these elements in the deliverables when you'll use → [4].
What's above is just a very simple example. It's of course possible to mix profiling attributes excluding contents and attributes flagging contents in the same profile.
[4] This works because, as explained in Section 4.1, “How it works”, saving status.profiles automatically creates status_file/HighlightStatus.ditaval:
<val>
  <prop action="flag" att="status" color="#339900" val="changed"/>
  <prop action="flag" att="status" style="line-through" val="deleted"/>
  <prop action="flag" att="status" style="underline" val="new"/>
</val>
| | | |
| 3. Using the facilities added by the "Easy Profiling" add-on |  | 5. Dialog box reference |