| 17.3. Creating and using an annotated variant of image file | ||
|---|---|---|
 | 17. The "Edit Image Map" dialog box |  |
| 17.3. Creating and using an annotated variant of image file | ||
|---|---|---|
| | 17. The "Edit Image Map" dialog box | |
Normally, the “hot areas” drawn using the image map editor are not visible to the user. For example, if you convert a DITA imagemap to XHTML, the Web browser will simply display the image as is. The user will understand that the image has “hot areas” only when she/he'll hover the mouse pointer above these “hot areas”.
However, in some cases, making the “hot areas” visible and/or giving them numbers so they can be referred to by number may be useful. This can be done by clicking the  "Create and use an annotated variant of image file" button and checking the "" and/or "" checkboxes.
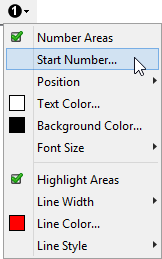
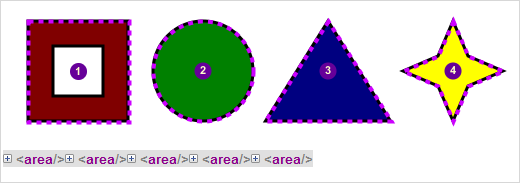
The other entries of the above menu let the user customize the appearance of the visual marks she/he has chosen to add to the image. In the following figure, the user has chosen yellow on purple numbers using a 9pt font size and thick, dashed, purple highlights.
Note that these visual marks are not rendered by the image map editor itself, as this would make drawing new shapes more difficult. Instead, it works as follows: after checking the "" and/or "" checkboxes and clicking , an SVG image embedding the original image and adding the chosen visual marks above this image is automatically generated.
For example, if a DITA imagemap contains <image href="images/imagemapworld.jpg">, this facility automatically generates SVG file "imagemapworld.jpg.marked.svg" and replaces the value of the href attribute by images/imagemapworld.jpg.marked.svg.
Note that the format of the image to be annotated must be GIF, PNG, JPEG or SVG, otherwise the "Create and use an annotated variant of image file" toolbar button is disabled (grayed).
![[Important]](images/important.svg) | Image annotations are created only for areas having link targets |
|---|---|
“Dead areas”, that is, areas having no link targets, are ignored by this facility. Therefore, if you use tool bar button "" in XMLmind XML Editor - DocBook Support and select "" to add a
|
| |  | |
| 17.2. Using the image map editor |  | Appendix A. Command line options |