| |
| |
When a DITA topic (of any kind) is opened in XMLmind XML Editor, the XML menu becomes the Topic menu and this menu is populated with items which are specific to DITA topics. This reference contains a description of such menu items.
 Paste from Word, Browser or
Markdown
Paste from Word, Browser or
Markdown Markdown
TipThis
menu entry allows not only to paste snippets copied from
word processors or web browsers, but also to import entire
documents or HTML pages. In order to import the entire
document into XXE:
|
TipIf, using MS-Word, you want
to copy a piece of text rather than a paragraph, do not
include the hidden character found at the very end of a
paragraph (the paragraph mark) in your
selection.
|
<pre> element,
TipIf you need to paste the
copied text as an ordered list, first paste this text as an
itemized list then convert the pasted list to an ordered
list using (Ctrl-T).
|
<image>,<fig>. Parse Markdown as XML Parse Text as
XML
Parse Text as
XML<u>), subscript <p>1. <term>Dart</term> is a **programming language**. See [Dart](https://dart.dev/).</p>
<ol compact="yes">
  <li><term>Dart</term> is a <b>programming language</b>.
  See <xref href="https://dart.dev/" scope="external">Dart</xref>.</li>
</ol>
<indexterm> element or if a single element
or node is explicitly selected anywhere inside an
<indexterm> element, this menu item
displays an <indexterm>
editor dialog box allowing to modify this
<indexterm> element.
<indexterm> editor dialog
box allowing to create a new <indexterm>
element and then to insert it at caret position.
TipIf some text has been selected, field
Term of the dialog box is automatically
initialized with the text selection. Therefore the simplest way to
create an
<indexterm> element is first to
select the term in the body of the document, then invoke
and finally click
OK. |
 Move Up
 Move Down
 Check External
References
Check External
References<xref> elements having attribute
@scope="external") found in the document
being edited. All kinds of external resources are checked for
existence: images, audio, video, PDF documents, HTML pages, etc.
When the resource is an HTML page and the link ends with a
fragment (e.g. "#bar" in "../doc/foo.html#bar")
then this fragment is also checked for existence.
NoteThe "Convert to RTF",
WML, DOCX,
ODT, entries documented below are absent in
XMLmind DITA Editor. They are found only in XMLmind XML
Editor.
|
AttentionThe items of this menu are
all disabled if the document being edited needs to be saved to
disk.
|
hhc.exe, as the helper application
associated to files having a "hhp" extension. This
can be specified by using the
Preferences dialog box,
Helper Applications section.
| Button | Description | ||
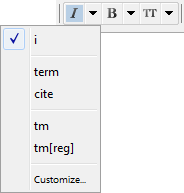
 Toggle
i Toggle
i |
“Toggle” element
<i>.
Next to this toggle is found an arrow button displaying a menu
containing additional checkboxes for the following elements:
<term>, <cite>,
<tm>,
tm[reg].
|
||
 Toggle
b Toggle
b |
“Toggle” element
<b>.
Next to this toggle is found an arrow button displaying a menu
containing additional checkboxes for the following elements:
<keyword>,
<uicontrol>,
<option>. |
||
 Toggle
tt Toggle
tt |
“Toggle” element
<tt>. Next to this toggle is found an arrow
button displaying a menu containing additional checkboxes for the
following elements: <filepath>,
<varname>, <cmdname>,
<apiname>, <codeph>,
<xmlelement>,
<xmlatt>,
<xmlpi>, |
||
 Change
case Change
case |
Displays a menu letting the user change the character
case of selected text. If a single node is selected, this converts
the character case of all the text contained in this node. If there
is no selection of any kind, this converts the character case from
caret position to end of word, then it moves the caret to the next
word.
|
||
 Convert to plain text Convert to plain text |
Convert implicit or explicit selection to plain
text.
|
||
 Add
xref Add
xref |
Displays a menu letting the user add a link —an
<xref> element— to your DITA
topic.
|
||
 Set
ID Set
ID |
This button displays a menu having 2 entries:
Set ID and List Anchors and
Links.
The List Anchors and
Links menu entry displays a dialog box letting the user
search and select anchors (that is, any element having an ID) and
links.
Figure 5. The "List Anchors and Links" dialog box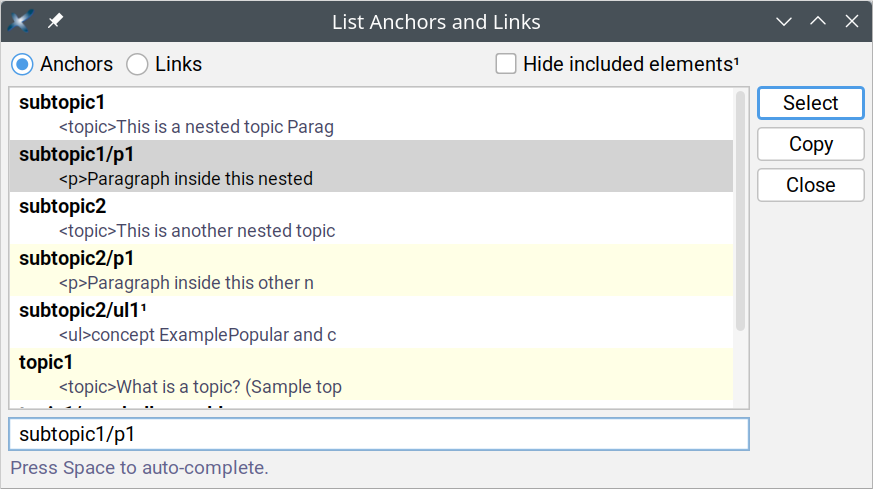
|
||
 Decrease nesting level Decrease nesting level |
Convert a paragraph to a list item and a list item to a
paragraph, the new element having a lesser nesting level than the
original one. This button automatically splits lists when needed
to.
This is the inverse command of "Increase
nesting level". More Information below.
|
||
 Increase nesting level Increase nesting level |
Convert a paragraph to a list item and a list item to a
paragraph, the new element having a greater nesting level than the
original one. This button automatically creates lists or merges
adjacent lists when needed to.
Note that the two above buttons
strictly alternate between paragraphs and list items. This means
that you'll often have to click a button twice in a row. For
example, in order to create a nested list, first click anywhere
inside a list item and then click "Increase nesting
level" twice. First click converts the list item to a
plain paragraph contained in the preceding list item. Second click
converts this paragraph to the first item of a new nested
list.
For the two above buttons to function, any of the
following conditions should be met:
|
||
 Change
list type Change
list type |
Displays a menu allowing to change the type of the
current list.
Additional menu entry "Continue
Numbering", which is rendered as a checkbox,
adds/removes "
continue" to/from the
@outputclass attribute of an ordered list.
Additional menu entry "Inherit Numbering",
which is rendered as a checkbox, adds/removes
"inheritnum" to/from the
@outputclass attribute of an ordered list. More
information about these values of the @outputclass
attribute in Section 4.1. Controlling the numbering of ordered lists.The list must be
explicitly or implicitly selected. In order to implicitly select a
list, suffice to click anywhere inside it.
Known problemsExcept for the simplest cases, "Continue
Numbering" is not correctly rendered in the
styled view of the document. For example, "Continue
Numbering" has no visual effect on
<ol> elements having an
<ol> ancestor.The reason of this
limitation is that the implementation of "Continue
Numbering" leverages standard CSS counters
|
||
 Add
list Add
list |
Displays a menu allowing to select a type of list
(
<ul>, <ol>,
<dl>). The chosen list is added after node
selection or after caret at a location where it is valid to do so
and where it makes sense to do so (see note). |
||
 Add Add
<p> |
Add a
p after node selection or
after caret at a location where it is valid to do so and where it
makes sense to do so.
|
||
 Add list item
 |
Add a list item of the right type after current list
item. For this command to work, suffice to click anywhere inside an
<sl>, <ul>,
<ol>, <dl>,
<choices>, <substeps>,
<steps>,
<steps-unordered>. |
||
 Add
footnote Add
footnote |
Displays a menu allowing the user to insert a footnote
(
<fn>) or a reference to a footnote
(<xref type="fn">) at caret position or after
caret at a location where it is valid to do so.If a reference
to a footnote is already selected, the
"xref[fn]" menu entry lets the user choose
the ID of the footnote to be referenced.
|
||
 Add
note Add
note |
Displays a menu allowing the user to add different kinds
of admonitions after node selection or after caret at a location
where it is valid to do so.
|
||
 Add
pre Add
pre |
Displays a menu allowing the user to add a
<pre>, <lines>,
<screen>, <codeblock>
or a <msgblock> after node selection or after
caret at a location where it is valid to do so and where it makes
sense to do so (see note).Menu entry
"Normalize Whitespace" normalizes whitespace
in implicitly or explicitly selected program listing. Normalizing
whitespace means: expanding tab characters to a number of space
characters and removing the space characters which are common to the
beginning of all text lines (that is, removing the superfluous
“indentation” in the program listing, if
any).
|
||
 Add
image Add
image |
Displays a menu letting the user:
|
||
 Add MathML
equation Add MathML
equation |
Displays a menu letting the user add various kinds of
MathML
|
||
 Insert media object Insert media object |
Displays a menu allowing to insert a media element at
caret position.
More information about the above “media
objects” in Section 4.4. Rich media content.
|
||
 Add
section Add
section |
Add a <section> or an
<example> after node selection or after caret
at a location where it is valid to do so and where it makes sense to
do so (see note). |
||
 Add
table Add
table |
Displays a menu allowing the user to add a
<simpletable> or a
<table> after node selection or after caret
at a location where it is valid to do so and where it makes sense to
do so (see note). |
||
   Table
editor Table
editor |
See Table editor below. See also Section 4.2. Giving a background color to table cells. |
<simpletable>s as well
as CALS <table>s. Most table editing commands can
be repeated by using (Ctrl-A).@cols attribute of a
<tgroup> is up to date. That is, you may forget
about the @cols attribute, XMLmind XML Editor will
always compute it for you.| Button | Menu item | Description | ||
|
Table column For a command in
this menu to work, click anywhere inside a cell(3).
|
 Insert Before
 |
Insert a column before column containing specified cell. | ||
 Insert After
 |
Insert a column after column containing specified cell. | |||
 Cut
Cut |
Cut to the clipboard the column containing specified cell. | |||
 Copy
Copy |
Copy to the clipboard the column containing specified cell. | |||
 Paste
Before Paste
Before |
Paste copied or cut column before column containing specified cell. | |||
 Paste
After Paste
After |
Paste copied or cut column after column containing specified cell. | |||
 Delete
 |
Delete the column containing specified cell. | |||
 Sort
Rows Sort
Rows |
Sort all the rows of the table according to the
string values of the cells of the “selected
column”. (The “selected column” is the
column containing specified cell.)
A dialog box is
displayed allowing to specify the following sort
options:
Note that:
|
|||
|
Table row For a command in this
menu to work, click anywhere inside a cell(3) or explicitly select
a row.
|
 Insert Before
 |
Insert a row before row containing specified
cell.
|
||
 Insert After
 |
Insert a row before row containing specified cell. | |||
|
Cut |
Cut to the clipboard the row containing specified cell. | |||
|
Copy |
Copy to the clipboard the row containing specified cell. | |||
| Paste
Before |
Paste copied or cut row before row containing specified cell. | |||
| Paste
After |
Paste copied or cut row after row containing specified cell. | |||
|
Delete |
Delete the row containing specified cell. | |||
|
Table cell For a command in this
menu to work, click anywhere inside a cell(3).
|
 Increment Column Span
 |
Increment the number of columns spanned by specified
cell. Not relevant for
<simpletable>s. |
||
 Decrement Column Span
 |
Decrement the number of columns spanned by specified
cell. Not relevant for
<simpletable>s. |
|||
 Increment Row Span
 |
Increment the number of rows spanned by specified cell.
Not relevant for
<simpletable>s. |
|||
 Decrement Row Span
 |
Decrement the number of rows spanned by specified cell.
Not relevant for
<simpletable>s. |
|||
 Set
Color Set
Color |
Displays a dialog box allowing to give a background
color to specified cell.
Figure 6. The "Set Color" dialog box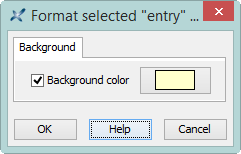 Unlike the other entries of this menu, this entry
allows to give a background color, not only to specified cell,
but also to one or more of any of the following explicitly
selected elements:
<simpletable>,
<sthead>,
<strow>,
<stentry>,
<tgroup>,
<thead>,
<tbody>, <row>,
<entry>. |
When a DITA topic (of any kind) is opened in XMLmind XML Editor, additional keyboard shortcuts and additional drag and drop facilities which are specific to this kind of document are automatically made available to the user. This reference contains a description of such user input/command bindings.
| Action | Description |
| Alt+Shift-Up |
Same as menu item Move
Up.
|
| Alt+Shift-Down |
Same as menu item Move
Down.
|
| Alt+Shift-Left |
Same as toolbar button Decrease nesting
level.
|
| Alt+Shift-Right |
Same as toolbar button Increase nesting
level.
|
| Ctrl+Alt-click (Cmd+Alt-click on the Mac) |
Follow the link clicked upon.
|
| Enter |
Insert a newline character if possible. Otherwise, if
caret is at the beginning of a paragraph, list item or a few other
kinds of block, insert same block before. Otherwise, if caret is at
the end of a block, insert same block after. Otherwise, split
block.
|
| Del |
Delete selection if any. Otherwise, if caret is at the
end of a paragraph, list item or a few other kinds of block, join
with following block. Otherwise, delete character following
caret.
|
| BackSpace |
Delete selection if any. Otherwise, if caret is at the
beginning of a paragraph, list item or a few other kinds of block,
join with preceding block. Otherwise, delete character preceding
caret.
|
| Ctrl-Enter |
Add same block after the paragraph, list item or a few
other kinds of block which is the ancestor of selected
node.
|
|
Drop an object.
|
If the drop occurs above an element having an
@href attribute other than an
<image> (e.g. an
<xref>), the dropped string is considered to
be an URL and is used to change the value of the
@href attribute.Note that this kind of drop
attempts to relativize the dropped URL against the location
of the drop site. For example, if you drop
"file://home/john/doc/topic1.dita" onto an
<xref> contained in file
"file://home/john/doc/ref/reference2.dita", its
@href is set to
"../topic1.dita".Elsewhere, normal behaviour which
is:
|
|
Drag one of the “handles” displayed around
an image. (The “handles” are displayed after clicking on
the image.)
|
Resize the image, but always preserve its aspect
ratio.
Pressing Ctrl (Cmd on the Mac) while
dragging the handle allows to distort the image.
|
|
Drag a separator found between two table
columns.
|
Resize the table column. More precisely this gives an
appropriate proportional width (e.g.
<colspec colwidth="3*">) to all table
columns.
|
| (1) | Note that Ctrl-V, that is, the plain command, would not work here. |
| (2) | "Parse Markdown as XML" may be replaced by a variant called "Parse Text as XML" when the "MathML support" add-on is installed. |
| (3) | or explicitly select a cell or an element having a cell ancestor |
| |