| 17.2. Using the image map editor | ||
|---|---|---|
 | 17. The "Edit Image Map" dialog box |  |
| 17.2. Using the image map editor | ||
|---|---|---|
| | 17. The "Edit Image Map" dialog box | |
An image area is added as follows:
Click the , or button to select the corresponding drawing tool.
Draw a shape as you would do it in any vector graphics editor.
Note that in the case of the Polygon tool, you'll have to right-click anywhere and select "" in the contextual popup menu to close the polygon. More information in Section 17.2.1, “The toolbar of the image map editor”.
Doing this adds an area to the Areas list found at the left of the image map editor. The newly added area is automatically selected. The tool is also automatically selected, that is, the current “drawing mode” is automatically abandoned.
Optionally adjust the position and size of the selected shape as you would do it in any vector graphics editor.
Optionally specify a link target for the new added area. This is done by clicking button which displays the The "Edit image map area" dialog box. More information in Section 17.2.2, “Specifying the link target and optionally the link text of selected area”.
![[Important]](images/important.svg) | The order of areas in the Areas list is significant |
|---|---|
|

Select, move or resize area. | |
Add rectangular area. Click on the first corner of the rectangle and drag to specify the opposite corner of the rectangle. | |
Add circular area. Click on the center of the circle and drag to specify the radius of the circle. DocBook | |
Add polygonal area. Drag to draw at least two sides of the polygon then right-click anywhere and select "" in the contextual popup menu to close the polygon. DocBook | |
Displays the Zoom menu. | |
Displays and also allows to adjust the current zoom level. The zoom level may also be changed by using the mouse wheel while pressing the Ctrl key (Cmd key on the Mac). | |
Displays the "Create and use an annotated variant of image file" menu. More information about this facility in Section 17.3, “Creating and using an annotated variant of image file”. | |
The button. | |
The button. | |
The button. |
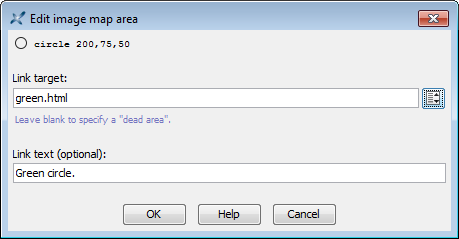
The "Edit image map area" dialog box is displayed by clicking the or "" buttons.
The "Link target" field contains the target of the link. This link target may be a destination which is internal to the document being edited or external to it, typically a Web page.
Click the  "" button to specify an internal link. This button displays the same dialog box as the "" entry found in the contextual popup menu after right-clicking an hypertext element (e.g. XHTML
 a).
Drag a link location from a Web browser and drop it into the "Link target" field to specify an external link.
DocBook 4 imageobjectco element only supports internal links.
DocBook has a facility — → in XMLmind XML Editor - DocBook Support— allowing to automatically link areas and items found in a calloutlist element. With this facility, there is no need to use the "Edit image map area" dialog box.
The "Link text" field contains an optional description of the link target. This description is ignored unless a link target has been specified.
DocBook 4 imageobjectco element does not support link text.
| |  | |
| 17.1. Adding an image map to your document |  | 17.3. Creating and using an annotated variant of image file |