| 6. User preferences | ||
|---|---|---|
 |  | |
| 6. User preferences | ||
|---|---|---|
| | | |
By default, the user preferences are stored in the following directory:
$HOME/.xfc/
$HOME/Library/Application Support/XMLmind/FOConverter/
%APPDATA%\XMLmind\FOConverter\C:\Users\john\AppData\Roaming\XMLmind\FOConverter\.
You may delete this directory if you want to restore the “factory settings”.
File user_preferences_dir/xslutil.conversionsdb5To, XXXdbTo, XXXxhtmlTo, etc) and to delete all the user's original conversion specifications.XXX
The -p command-line option allows to specify a custom user preferences directory. This option may be used when XMLmind XSL Utility is used as a graphical application:
/opt$ xslutil-6_7_0/bin/xslutil -p /usr/local/share/xslutil &
or when XMLmind XSL Utility is used as a command-line tool:
/opt/xslutil-6_7_0/bin$ xslutil -p /usr/local/share/xslutil \
    dbToDocx /tmp/help.xml /tmp/help.docx
Specifying a custom user preferences directory allows to use XMLmind XSL Utility, a convenient graphical application, to configure the conversions of XMLmind XSL Server. For example, if xslsrv/WEB-INF/web.xml contains:
<init-param>
  <param-name>customizeDir</param-name><param-value>/etc/xslutil</param-value>
</init-param>
then run xslutil -p /etc/xslutil to configure the conversions of XMLmind XSL Server.
If this toggle is checked, the native file chooser will be used in preference to Java's multi-platform file chooser.
Note that file extension filters are not supported when the native file chooser is invoked by Java™.
Default: not checked on Windows and on the Mac, disabled (grayed out) on the other platforms.
Some conversion (example: conversion to multi-page HTML, to Eclipse Help) require an output directory rather than an output file. This output directory will be created if it does not exist. However, if it exists, the output directory will be made empty before performing the conversion, which is potentially dangerous. When this option is turned on, you'll have to confirm that you really want to delete all the files contained in the output directory before proceeding with the conversion. We do not recommend to turn this option off.
Default: checked.
Compiling an XSLT stylesheet may take a few seconds. When this option is turned on, an XSLT stylesheet is compiled the first time it is used and then, it is cached in compiled form for all subsequent uses. Unless you are developing a XSLT stylesheet and testing it with XMLmind XSL Utility, there is no need to turn this option off.
Default: checked.
Clicking this button allows to restore all the stock conversion specifications. The user's original conversion specifications are, of course, left untouched.
![[Note]](images/note.svg) | Converting DITA documents to HTML Help |
|---|---|
In addition to letting you specify which external applications are launched when "" is checked, this preferences sheet also lets you specify the location of |
List of file types. Each file type has an associated helper application. This helper application is assumed to be able to open files detected as having this type. A helper application may be a viewer or an editor.
The following buttons may be used to modify this list:
Displays the "Helper Application Editor" dialog box in order to add a new file type to the list.
Displays the "Helper Application Editor" dialog box in order to view or modify selected file type.
Removes selected file type from the list.
Specifies which default viewer to use in case the type of the file to be opened has not been detected. In practice, commands making use of the default viewer typically assumes that it is in fact a Web browser. This implies that these commands assume that a default viewer can open URLs as well as filenames and that it can open text, HTML, GIF, PNG and JPEG files.
This field must contain a command line interpreted by the native shell of the platform: cmd.exe on Windows and /bin/sh on the Mac and on Unix.
This command line must reference one of these two substituted variables: %U and %F. In principle, %U is replaced by the URL of the file to be opened by the helper application and %F is replaced by a filename. In practice, %U is just a hint meaning: the helper application can open URLs as well as filenames.
Default: depends on the platform:
On Windows: start "" "%U"
On the Mac: open "%U"
On Unix: dynamically detected. For example: firefox "%U"
The following buttons may be used to modify this field:
Resets the field to its default value (see above).
Displays the standard file chooser in order to specify an application (e.g. a .exe or a .bat file on Windows). String " "%F"" is automatically appended to the chosen application.
See also Helper applications on the Mac.
This dialog box allows to view or modify a file type listed in the "Helper applications" preferences sheet.
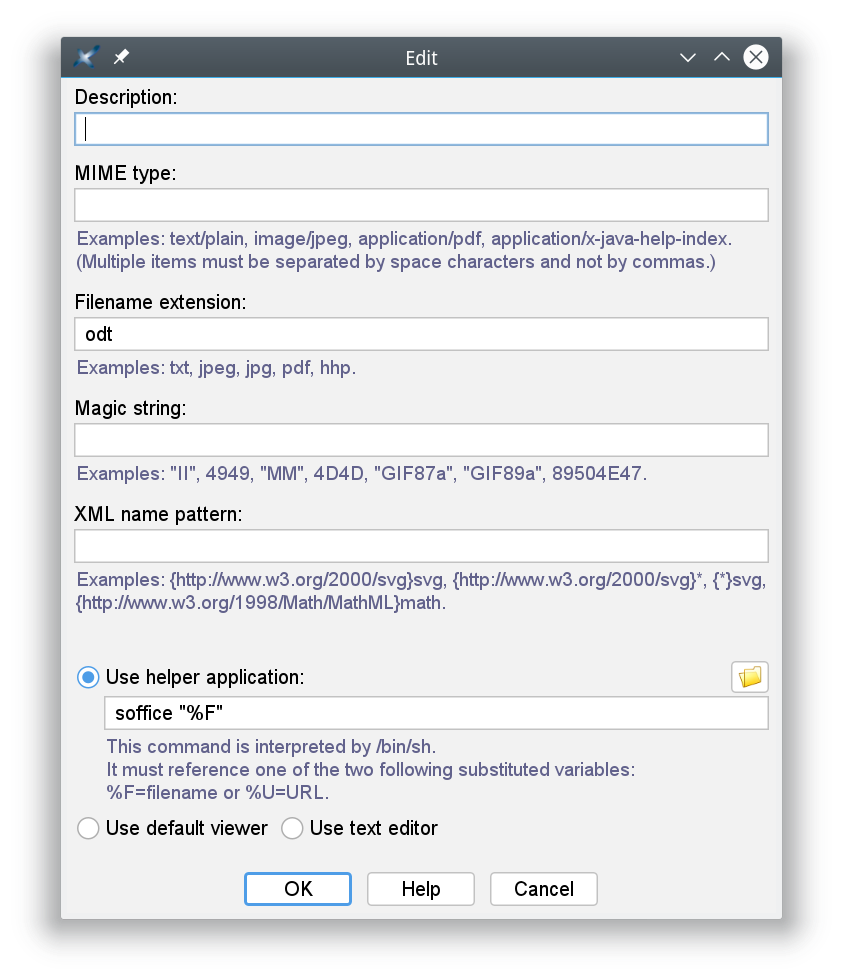
A file type is specified by at least one of the following characteristics:
The official (or just well-known) formal name of the file type. Generally returned by Web servers to their client Web browsers. Non-registered MIME types typically start with string "application/x-".
A MIME type may end with a wildcard. Example: "image/*" matches "image/gif", "image/jpeg", etc.
Examples: text/plain, image/jpeg, application/excel, application/x-java-help-index.
If the filename or URL of a file ends with specified ".", then this file is detected as having this file type.extension
An extension may or may not start with a dot. This is unimportant because, in all cases, a leading dot would be automatically stripped.
Examples: txt, jpeg, jpg, xls.
For some file formats, the first bytes of a file are always the same and therefore, can be considered as being the signature of this file type.
If a file starts with specified first bytes, then this file is detected as having this file type. This type of detection is supposed to work like magic, hence the name: ``magic string''.
A magic string may be specified by a the hexadecimal representation of a sequence of bytes (example, one of the two TIFF magic strings: 4949) or by a quoted sequence of ASCII characters (same example, one of the two TIFF magic strings: "II").
Examples: TIFF: "II" or 4949, "MM"or 4D4D; GIF: "GIF87a", "GIF89a"; PNG: 89504E47; PDF: "%PDF-".
If the root element of an XML file has a name which matches specified pattern, then this XML file is detected as having this file type.
An XML name pattern follows this syntax:
( '{' namespace_URI? '}' )? local_partOne of local_part or namespace_URI may be equal to wildcard "*"
Examples: {*}svg, {http://www.w3.org/1998/Math/MathML}:math.
Each file type has an associated helper application. This helper application is assumed to be able to open files detected as having this type. A helper application may be a viewer or an editor.
Description of the file type. Not mandatory, just recommended. This text is displayed in the File types list of the "Helper applications" preferences sheet.
One or more MIME types (see definition above) separated by spaces.
One or more extensions (see definition above) separated by spaces.
One or more magic strings (see definition above) separated by spaces.
One or more XML name patterns (see definition above) separated by spaces.
This field must contain a command line interpreted by the native shell of the platform: cmd.exe on Windows and /bin/sh on the Mac and on Unix.
This command line must reference one of these two substituted variables: %U and %F. In principle, %U is replaced by the URL of the file to be opened by the helper application and %F is replaced by a filename. In practice, %U is just a hint meaning: the helper application can open URLs as well as filenames.
The  button displays the standard file chooser in order to specify an application (e.g. a
 .exe or a .bat file on Windows). String " "%F"" is automatically appended to the chosen application.
Files having specified type are to be opened using the default viewer. The default viewer is specified in the "Helper applications" section of the "Preferences" dialog box.
Files having specified type are to be opened using the “default text editor”.
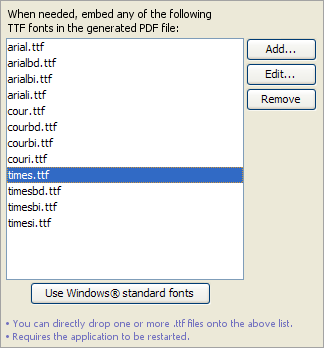
By default, only the 14 built-in fonts: Times, Helvetica, Courier, Symbol and ZapfDingbats are used in the generated PDF. The above preferences sheet allows to specify which custom TrueType (.ttf) fonts are to be embedded in the generated PDF.
This facility is useful in the following two cases:
The 14 PDF standard fonts (Helvetica, Times, Courier, etc), which are used by default by FOP, have glyphs only for the Western languages. If, for example, you convert a DocBook document written in Russian to PDF, the generated PDF will mainly contain the '#' placeholder character. Fortunately, widely available TTF fonts such as Microsoft® Arial, Times New Roman and Courier New or the DejaVu fonts have glyphs for almost all the languages of the world.
Use fonts nicer than the 14 PDF standard fonts.
Click .
Note that the button is grayed if the Arial font is not found in the standard fonts folder of your system.
Click .
Restart XMLmind XSL Utility.
Click .
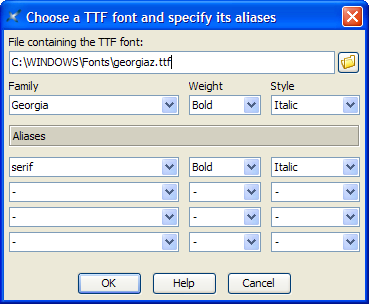
This displays the following dialog box:
Choose the .ttf file containing font "Georgia".
![[Tip]](images/tip.svg) | |
On Windows, for permissions reasons, there is no way to pick a font file from the " However, after you do this, do not forget to select each entry added by the drop action and then click to possible change or complement what's have been automatically specified there. |
Specify the following alias: serif.
Click .
Click .
Choose the .ttf file containing font "Georgia Bold".
Specify the following alias: serif, Bold.
Click .
Click .
Choose the .ttf file containing font "Georgia Italic".
Specify the following alias: serif, Italic.
Click .
Click .
Choose the .ttf file containing font "Georgia Bold Italic".
Specify the following alias: serif, Bold, Italic.
Click .
Click .
Doing this automatically creates a standard FOP configuration file in user_preferences_dir/fop/fop.confuser_preferences_dir is documented in Section 6, “User preferences”.
It is recommended to repeat the above steps in order to specify fonts replacing Helvetica, that is, fonts having a sans-serif alias and fonts replacing Courier, that is fonts having a monospace alias.
Restart XMLmind XSL Utility.
| Using in XSL Utility an existing FOP configuration file |
|---|---|
The location of an existing Apache FOP configuration file may be specified to XSL Utility by the means of Java™ system property or environment variable |
XEP preferences are identical to FOP preferences. There are two minor differences though:
Some fonts have licensing restrictions that forbid embedding them in a PDF file. RenderX XEP enforces these licensing restrictions, not Apache FOP. XMLmind XSL Utility has currently no way to detect these licensing restrictions, therefore you may follow the above procedure and end up with glyphs still missing in the generated PDF.
The standard XEP configuration file is created in user_preferences_dir/xep/xep.conf
| Using in XSL Utility an existing XEP configuration file |
|---|---|
The location of an existing RenderX XEP configuration file may be specified to XSL Utility by the means of Java™ system property or environment variable |
| | | |
| 5. Specifying a conversion |  | A. Variables |