Easily create DocBook olinks
A refresher about olinks
The DocBook
olink element allows to create a link between two different
documents. For example, it allows to create a link in document
folder1/Article1.xml pointing to the section having
"sectionA" as its ID which is found in document
folderA/ArticleA.xml.
The olink element used to
represent the aforementioned link is:
<olink targetdoc="articleA" targetptr="sectionA"></olink>
- Notice that the target document is specified by a symbolic name,
"
articleA", rather then by its URL, "folderA/ArticleA.xml". - The value of the
targetptrattribute is simply the ID of the target element as contained in the target document. This attribute is optional. Without it, theolinkimplicitly points to the root element of the target document. - An
olinkcan optionally contain some text. When this text is absent, the DocBook XSL stylesheets automatically use the content of thetitlechild element of the target element.
Where to find the symbolic name of each document involved in olinking? The DocBook XSL stylesheets requires such documents to be declared in a special XML file called a sitemap. The sitemap file describes the directory structure of your HTML or PDF output tree. You must declare the symbolic names of your documents in this file. Example:
<!DOCTYPE targetset [
  <!ENTITY article1 SYSTEM "folder1/target.db">
  <!ENTITY articleA SYSTEM "folderA/target.db">
]>
<targetset>
  <sitemap>
    <dir name="docs">
      <dir name="folder1">
        <document targetdoc="article1">
          &article1;
        </document>
      </dir>

      <dir name="folderA">
        <document targetdoc="articleA">
          &articleA;
        </document>
      </dir>
    </dir>
  </sitemap>
</targetset>
It is customary to use the ID of the root element of a document as its symbolic name.
Processing a set of olinked documents using the DocBook XSL stylesheets is not a simple task and we'll not attempt to describe it in this tutorial. For more information please refer to DocBook XSL: The Complete Guide by Bob Stayton.
In the following
section, we'll see how XMLmind XML Editor can help you create
olink elements. However it is important to understand that
XMLmind XML Editor (XXE for short) cannot help you in putting
these olink elements into use when converting your DocBook
document to HTML, PDF, etc. For example, XXE cannot assist
you in creating the sitemap file, in populating it with link targets, etc.
All these tasks must be performed “by hand”, outside
XXE.
How XMLmind XML Editor can help you
- Use DocBookSet up olinks to declare all your DocBook documents (XMLmind XML Editor cannot read your sitemap file). This is done once for all. See how below.
- Use the Edit tool to insert an empty
olinkelement at caret position or to convert selected text to anolinkelement. - Right-click anywhere inside the
olinkelement. Doing this displays a contextual popup menu having a "Set Link Target" entry. Selecting this "Set Link Target" entry displays the following dialog box:
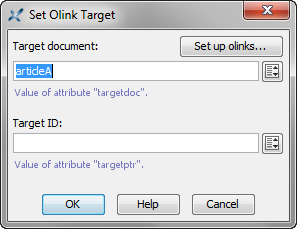
Both text fields in the above dialog box support autocompletion. Moreover, clicking
 displays a value chooser dialog box which
may be more convenient to use:
displays a value chooser dialog box which
may be more convenient to use: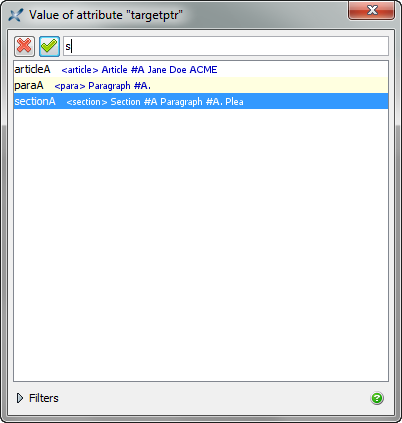
Alternatively, you may use the Attributes tool to specify
the targetdoc attribute and optionally, the targetptr
attribute of an olink element. If, and only if,
DocBookSet up olinks has
first been used to declare all your DocBook documents, then you'll be able
to use the autocompletion facility of the Attributes tool when
you'll specify the values of the targetdoc and targetptr
attributes.
Set up olinks
The DocBookSet up olinks menu item displays the following dialog box:
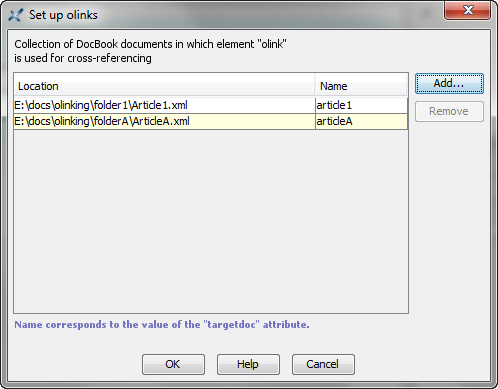
Basically this dialog box allows
to create a list of DocBook 4 and/or DocBook 5 documents., each document
being specified by its URL (e.g.
"file:/E:/docs/olinking/folderA/ArticleA.xml") and its symbolic
name (e.g. "articleA"). This list is specified once for
all.
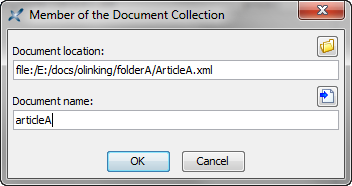
Make sure to specify the same
symbolic name as the one found in your sitemap. If, by convention, your
organization always uses the ID of the root element of a document as its
symbolic name, then suffice to click the  button.
